Blender scripting
Text window: Alt-P and ScriptButtons
Scripts allow procedural animation and more,
for simulation, automation, or anything you can
dream up
More: Blender scripting page.
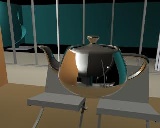
Environment mapping
Texture menu: F6
This texture type mimics mirroring surfaces. It is a common and fast
alternative for raytracing. Especially soft (blurred) mirror effects can be expressed
excellently. More: EnvMap manual page.
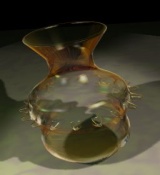
Radiosity
New buttons menu
Radiosity is a rendering method based at energy transport by faces. Starting with
an emittor, light bounces through a 3D model until all energy is absorbed.
The result of Radiosity in Blender is a 3D model with vertex colors. It simulates
extremely realistic lighting conditions.
More: Radiosity manual page.
VRML 1.0 export
Hotkey: CTRL+F2
Blender writes all Meshes, Materials and Objects to a single file. Including vertex colors.
In the next versions facilities for texture coordinates will be added.
DXF export
Hotkey: SHIFT+F2
Blender writes all Meshes, Materials and Objects to a single file.
Plugin Develop kit
For the UNIX versions,
Blender supports a number of types of plugins to allow additional control over rendering.
Currently these are:
Texture plugins, which can extend the current texture editor to provide
control over intensity, color, and bump-mapping.
Sequence plugins, which can provide
post-processing and transition facilities in the sequence editor.
Examples of plugins are included in each download since 1.60.
Read the developer documentation for more about this.
The next few months we will collect and publish new plugins regularly.
|
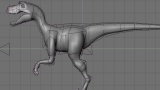
S-Meshes
EditButtons: F9
S-meshes allow an easy access to smooth organic modeling. You can work with regular
Meshes as if it were Nurbs Surfaces.
More: S-Mesh manual page.
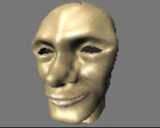
Relative vertex keys
AnimButtons: F7 and IPO Window: VertexKeys
Relative vertex keys simplify the creation of complex facial
and character animation by blending sets of vertex
poses. More: Relative vertex keys manual page.
Motion Blur
Displaybuttons, F10 menu
This option mimics a natural (or long) shutter time by accumulating multiple frames.
- The number-button "Bf:" defines the length of the shutter time.
- The value of 'Osa' (5,8,11,16) defines the number of accumulated images.
- Setting the "OSA" option makes each acumulated image having antialising.
Automatic Smooth Angle
EditButtons, F9 menu
Use this option to render 'smooth' without having to adapt ("Y-split") the geometry
- The number-button "Degr:" defines the maximum angle faces can make to be smoothed.
- Automatic smoothing is only visible in rendering.
- Use it to render imported CAD models with a complex connected geometry.
Mesh Intersection
Editbuttons, F9 menu
Select the faces that need an intersection and press this button. Blender now intersects
all selected faces with each other.
Best example to test this, is with an IcoSphere and a Cube. After intersection, a user
can select with LKEY the individual parts. By removing certain parts, a user can
easily obtain a boolean operation like OR, AND or XOR.
To ensure a proper intersection, it is important to follow these guidlines:
- Make sure no co-planar faces intersect.
- Always make sure faces have as few intersections as possible, for example intersecting a
a single pane with a tube works better when the plane is subdivided a few times.
- The secret trick: rotate each part slightly, just a fraction of a degree.
- Before intersecting, save the file or press TAB-TAB to create an UNDO possibility. It
still is possible to make Blender crash with this routine.
Linked Libraries
Hotkey: SHIFT+F1
This feature is described in the manual. It is an extremely sophisticated feature best
used when a user is familiar with Scene management in Blender.
|